
When it comes to modifying Android, the single, most powerful tool available is TWRP custom recovery. It's even more capable than simple root access when it comes to changing the look and feel of your software, and you can even use TWRP to root your device in a few simple steps.
Thanks to some hard work from lead developer Ethan Yonker, TWRP recovery is now available for the Google Pixel and Pixel XL. With this one installed, you'll be able to flash ZIPs, make full system backups, and even install a custom ROM on your Pixel—so I'll show you how to set it up below.
Requirements
Step 1: Re-Flash the Stock Boot Image (Rooted Users Only)
If you've already rooted your Pixel or Pixel XL, you will have to flash the stock boot image for your device before you install TWRP. This process will un-root your device, but it's easy to re-root once you've installed TWRP, and I'll show you how to do that at the bottom of this article.
So first up, if you're rooted, download the factory images package for your Pixel or Pixel XL directly from Google. Then, extract the contents of the ZIP and open the folder this creates. From there, extract the second archive you'll find in this folder, then open that folder and copy the boot.img file.
Next, paste the boot.img file into the platform-tools folder inside of your ADB and Fastboot installation directory. For Windows users, this can be found at C:\Program Files (x86)\Android\android-sdk. For Linux and Mac users, it depends on where you installed ADB and Fastboot in the first place, so if you're not sure about the folder's location, search your computer for "platform-tools."
After that, Windows users can hold down the shift button on their keyboard, then right-click any empty space in the platform-tools folder and choose "Open command window here." Mac and Linux users will have to open a Terminal window and change directories to the platform-tools folder.
When you're done there, turn your Pixel or Pixel XL off. When the screen goes black, press and hold the volume down and power buttons simultaneously, and your phone will enter Bootloader Mode. From here, connect the phone to your computer with a USB data cable, then type the following command into the Terminal window:
- fastboot flash boot boot.img
Note that Mac users will have to add a period and a slash (./) to the beginning of the above command, and Linux users will have to add a slash (/).
When you're done there, press the power button to restart your phone, because you're now ready to install TWRP.
Step 2: Make Sure to Set Either a Password or a PIN
Because of the Pixel's new file-based encryption system, TWRP will need to temporarily decrypt your phone in order to allow you to flash ZIPs and create NANDroid backups. The only way it can do this is if you have already set a PIN or password as your lock screen security.
If you haven't already done that, head to the Security menu in Settings, then tap the "Screen lock" option. From here, select either "PIN" or "Password," then simply follow the prompts.
Step 3: Download the TWRP ZIP on Your Phone
Next, you'll need to download a flashable ZIP version of TWRP and make sure it's saved to your phone. So from your Pixel or Pixel XL, tap one of the following links, making sure to download the right ZIP for your particular device.
Step 4: Download the Boot Image Patcher ZIP
Next up, because of recent changes to Android Verified Boot (AVB), you'll need to download an additional ZIP to ensure that TWRP will be able to boot on your phone. This ZIP will automatically sign your boot image after TWRP injects some code into it, which will prevent AVB from interfering with the custom recovery. So from your phone, tap the following link to download the ZIP.
Step 5: Download the TWRP Image on Your Computer
After that, download the TWRP image file for Pixel or Pixel XL, but make sure to save this one to a folder on your computer that you can access easily.
Step 6: Move the TWRP Image to Your Platform-Tools Folder
Next up, copy the TWRP image file that you just downloaded, then paste it in the platform-tools folder inside of your ADB and Fastboot installation directory. For Windows users, this folder can be found at C:\Program Files (x86)\Android\android-sdk.
For Mac and Linux users, it depends on where you saved the ADB and Fastboot files when you installed the utility in the first place, so search your computer for the platform-tools folder if you don't remember.
Once you've moved the file to this folder, rename it to twrp.img to simplify things.
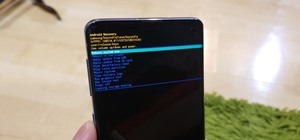
Step 7: Put Your Phone into Bootloader Mode
In order to run the commands that will install TWRP on your device, your phone will need to be in Bootloader Mode. So next, power your Pixel completely off. When the screen goes black, press and hold the volume down and power buttons simultaneously. Within a few seconds, you should be greeted by Android's Bootloader menu, which looks like this:
When you see this screen, plug your Pixel into your computer using the USB data cable that came with the device. Aside from that, leave the phone alone, as it's time to do some work on the computer side of things.
Step 8: Boot from the TWRP Image File
If you're using a Windows PC, hold down the shift button on your keyboard, then right-click any empty space inside of the platform-tools folder and choose "Open command window here." If you're using a Mac or a Linux machine, open Terminal, then change directories to the platform-tools folder.
Before we get into this next part, you should note that I'll be listing the commands for Windows users. Mac users will have to add a period and a slash (./) to the front of all commands shown here, and Linux users will have to add a slash (/) to the beginning (example: ./fastboot devices for Mac, or /fastboot devices for Linux).
So from the command prompt, enter the following command to verify that everything's connected properly:
- fastboot devices
If that returns a series of letters and numbers followed by the word "fastboot," then your device is connected properly and you're good to go. Otherwise, refer to this guide to check your ADB and Fastboot installation, and ensure that your Pixel is in Bootloader Mode as shown in Step 6.
Next, you'll be booting your phone off of the TWRP image file. This will temporarily run TWRP on your device, which will then allow you to flash the ZIP file and make TWRP your permanent recovery. So enter the following command into the prompt:
- fastboot boot twrp.img
Step 9: Flash TWRP & the Boot Image Patcher
At this point, your phone will boot into TWRP, but the custom recovery isn't permanent just yet. TWRP will automatically prompt you to enter your password or PIN so that it can decrypt your storage and modify system files, so use the on-screen keyboard to do just that.
Once you've entered your PIN or password, swipe the slider at the bottom of the screen when prompted. Then, once you make it to TWRP's main menu, tap the "Install" button and navigate to your device's Download folder. From here, select the twrp-pixel-installer.zip file that you downloaded in Step 3, then swipe the slider at the bottom of the screen to install it.
Once you've done that, tap the back button, then select the VerifiedBootSigner.zip file. From there, swipe the slider to install the ZIP, and when that's finished, tap "Reboot System." At this point, TWRP is now permanently installed as your custom recovery, so you'll be able to flash ZIPs and create backups, along with all of the other cool things that a custom recovery can do.
Step 10: Re-Root (Optional)
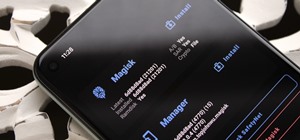
If you were previously rooted, or if you'd simply like to take this time to root your device, it's a really simple process now that you've got TWRP installed. To start, download the SuperSU flashable ZIP from your Pixel:
After that, boot your phone into Bootloader Mode by powering it off, then holding the volume down and power buttons simultaneously (like you're taking a screenshot). From there, press the volume down button twice to highlight the "Recovery Mode" option, then tap the power button to select it.
Next, from TWRP's main menu, tap the "Install" button, then navigate to your device's Download folder. From here, select the SuperSU ZIP file, then swipe the slider at the bottom of the screen to install it. After that, back out one level, then select and flash the VerifiedBootSigner.zip file. When that's finished, just tap "Reboot System," and when you get back up, you'll be fully rooted.
Who needs a wand? Unlock your magical powers and transform yourself from a Muggle into a Wizard or Witch just by using your Android phone. See how:


3 Comments
Now that VerifiedBootSigner is v8 and SuperSu is v2.82 or something, do I use these latest versions or stick to the versions mentioned in this guide?
One more thing; is there a way to just root pixel xl? I don't really need the TWRP because I'm always on the stock rom. I just need/use the rooting to install adaway to block ads.
I've been periodically updating the links, but if there's a newer version somewhere else, it's best to use those. Same instructions would apply for the foreseeable future.
As for your second question, the best workaround I know of would be to run through everything as-is (even installing TWRP), but then re-install the stock recovery image after you're done, which would remove TWRP.
For that, download the factory images package from Google here, then extract just the recovery.img file. Give it the same treatment where you move it to the platform-tools folder and open a command window there, but this time enter "fastboot flash recovery recovery.img" in the prompt.
Actually, there is one now (I'm not sure if it was there before).
With SuperSU v2.82 SR1 I did just that. Only one command line (without the need of installing TWRP).
First I upgraded my mobile to latest stock (June factory img), then I did the following
steps:
It will reboot the mobile few times, DONE!
Now I have Root and finally, can install AdAway.
Share Your Thoughts