
When it comes to modding an Android device, a custom kernel can take you farther than almost anything else. Most offer the ability to overclock your processor for performance gains, change your CPU governor, or even under-volt to increase battery life, among other features.
Our favorite custom kernel is definitely ElementalX by flar2—and, amazingly enough, it's already available for the Pixel and Pixel XL. In addition to the above, it gives you great features like double-tap to wake and sweep to sleep, and it even bypasses SafetyNet restrictions to get Android Pay and Pokémon GO working on devices with unlocked bootloaders.
Requirements
- Windows, Mac, or Linux computer
- ADB and Fastboot installed
- unlocked bootloader
Step 1: Download ElementalX
First up, you'll need to download the ElementalX kernel and save it to your computer. So click one of the following links to do just that, but note that these files are device-specific, so make sure to download the right one.
It's also worth noting that these kernel files are only intended for Android 7.1, so if you get a firmware update in the future, do not attempt to flash these files on newer Android versions.
Step 2: Move the File to Your Platform-Tools Folder
Next up, copy the file that you just downloaded, then paste it in the platform-tools folder inside of your ADB and Fastboot installation directory. For Windows users, this can usually be found at C:\Program Files (x86)\Android\android-sdk.
For Mac and Linux users, it depends on where you saved the ADB and Fastboot files when you installed the utility in the first place, so search your computer for the platform-tools folder if you don't remember.
Step 3: Put Your Device into Bootloader Mode
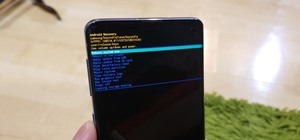
Next up, you'll need to put your phone into Bootloader Mode. To do that, power your Pixel completely off. When the screen goes black, press and hold the volume down and power buttons simultaneously. Within a few seconds, you should be greeted by Android's Bootloader menu, which looks like this:
When you see this screen, plug your Pixel into your computer using the USB data cable that came with the device. Aside from that, leave the phone alone, as it's time to do some work on the computer side of things.
Step 4: Flash ElementalX
Next, if you're using a Windows PC, navigate to the platform-tools folder again. From here, hold down the shift button on your keyboard, then right-click any empty space and choose "Open command window here." If you're using a Mac or a Linux machine, open Terminal, then change directories to the platform-tools folder.
Before we get into this next part, you should note that I'll be listing the commands for Windows users. Mac users will have to add a period and a slash (./) to the front of all commands shown here, and Linux users will have to add a slash (/) to the beginning (example: ./fastboot devices for Mac, or /fastboot devices for Linux).
So from the command prompt, enter the following command to verify that everything's connected properly:
- fastboot devices
If that returns a series of letters and numbers followed by the word "fastboot," then your device is connected properly and you're good to go. Otherwise, check your ADB and Fastboot installation, and ensure that your Pixel is in Bootloader Mode as shown in Step 3.
Next up, it's time to flash the ElementalX kernel, but note that there are different commands depending on whether you're using a Pixel or Pixel XL. To flash the kernel on a Pixel, type the following command:
- fastboot flash boot EX-P-0.05.img
Otherwise, to flash ElementalX on a Pixel XL, enter this command:
- fastboot flash boot EX-PXL-0.05.img
At this point, you can type fastboot reboot in the command prompt to restart your phone and boot back into Android if you'd like, at which point you'd already be running the ElementalX kernel. However, if you previously rooted your Pixel or Pixel XL, you'll have to patch the new kernel to re-root your device.
Step 5: Re-Root (Rooted Users Only)
Because of the way Chainfire's new root method works on the Pixel, you'll need to re-run the root script after installing any kernel if you'd like to retain root. If you've rooted your Pixel in the past, Chainfire's root script ("boot-to-root.img") should already be in your platform-tools folder—but if it's not, you can download the file again from Step 3 in this guide.
So for this part, start by making sure the boot-to-root.img file is in the platform-tools folder inside of your ADB installation directory. From there, open a command window in this folder, then type the following:
- fastboot boot boot-to-root.img
Once you've done that, the script will add the root files on top of your new ElementalX kernel then reboot your phone automatically. In other words, when your device finishes booting, you'll be rooted with ElementalX installed.
Step 6: Enjoy Your New Kernel
At this point, it's safe to disconnect the USB cable and go about using your phone as you normally would. Since you've now installed ElementalX, you'll get awesome features like double-tap to wake and sweep to sleep, which are gestures that can turn your screen on or off. In addition to that, the kernel itself is optimized for better performance and battery life.
If you'd like to take things a step further, you can install the ElementalX Manager app for $3.99. This allows you to customize many different features of your new kernel, including wake gestures, clock speed, voltage, CPU profiles, and even display calibration. In the future, it will even provide automatic kernel updates, once TWRP recovery becomes available for the Pixel.
Who needs a wand? Unlock your magical powers and transform yourself from a Muggle into a Wizard or Witch just by using your Android phone. See how:


Be the First to Comment
Share Your Thoughts